一个程序在运行的过程中,离不开对象的创建,那么对象究竟是怎么创建的呢?OC 作为一门高级语言,对象在底层又是怎么实现的,对象的本质又是什么呢?带着这些疑问,开启我们的探索旅程。
在开启我们的探索之旅之前,我们需要做一些准备工作。首先我们需要下载 objc 的源码,配置到工程中,以便于我们跟踪对象创建的过程。
对象的创建
创建对象的两种方法:
在 OC 中,我们一般有两种方法创建对象:
[[cls alloc] init]new
通过 [[cls alloc] init] 创建对象
我们首先来看 [[cls alloc] init] 是怎么创建对象的:
+ (id)alloc { |
// Replaced by CF (throws an NSException) |
从这几个方法中,可以看出:
对象创建在
alloc方法中init中只是简单的返回了已创建好的对象那么
init方法存在的理由是什么呢?这个方法就是 工厂模式 的应用了。
alloc方法一般都是系统准备好的用来创建对象的,作为用户(也就是各位程序员小哥哥小姐姐了)是接触不到的。但是作为用户,我们有时又必须在对象创建的时候做一些事情(如成员变量的初始化、赋值等),这个时候
init方法就派上用场了。这个时候是不是对我们平时写的init方法有了更深的认识。
通过 new 创建对象
对象可以通过 new 方法来创建:
+ (id)new { |
看到源码,是不是发现了什么:new = alloc + init
new 方法本质上是 alloc 和 init 的结合体。
创建对象
归根结底,对象创建都是通过alloc方法来实现的,那么就以此为起点,跟踪对象创建的过成。
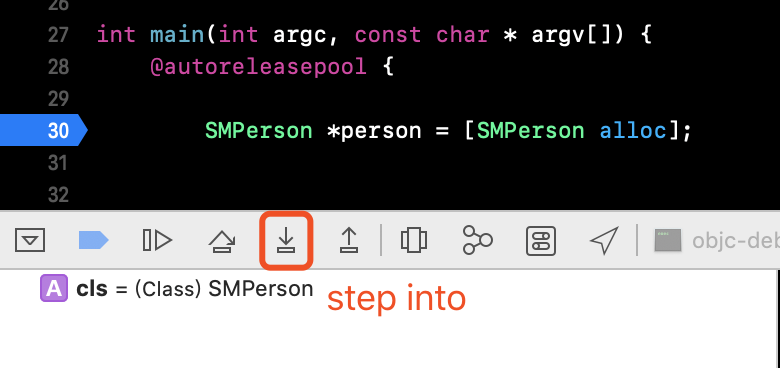
SMPerson *person = [SMPerson alloc]; |
我们在这行添加一个端点,然后进行 step into:
然后来到
id objc_alloc(Class cls) |
我们一步步跟踪,最后来到:
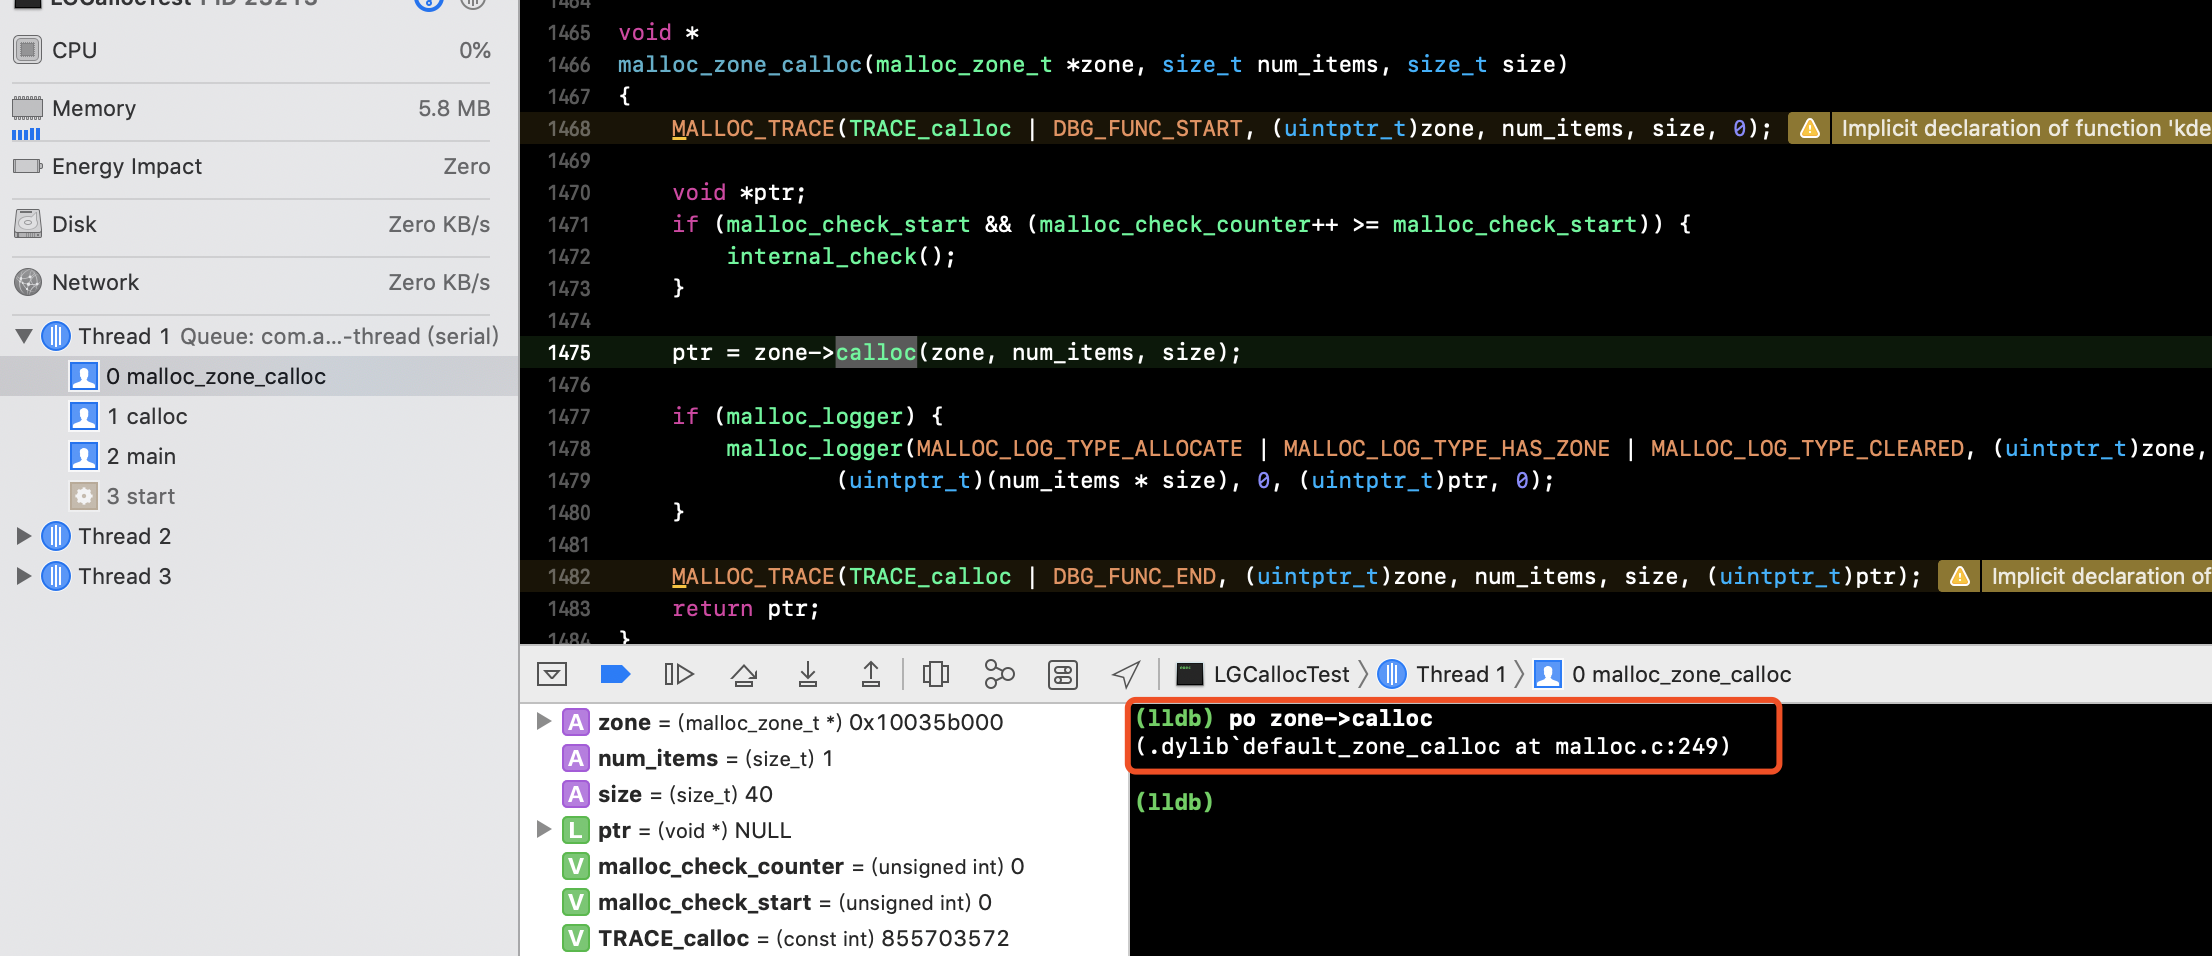
id _class_createInstanceFromZone(Class cls, size_t extraBytes, void *zone, |
根据整个流程,我们可以画出对象创建的流程图:
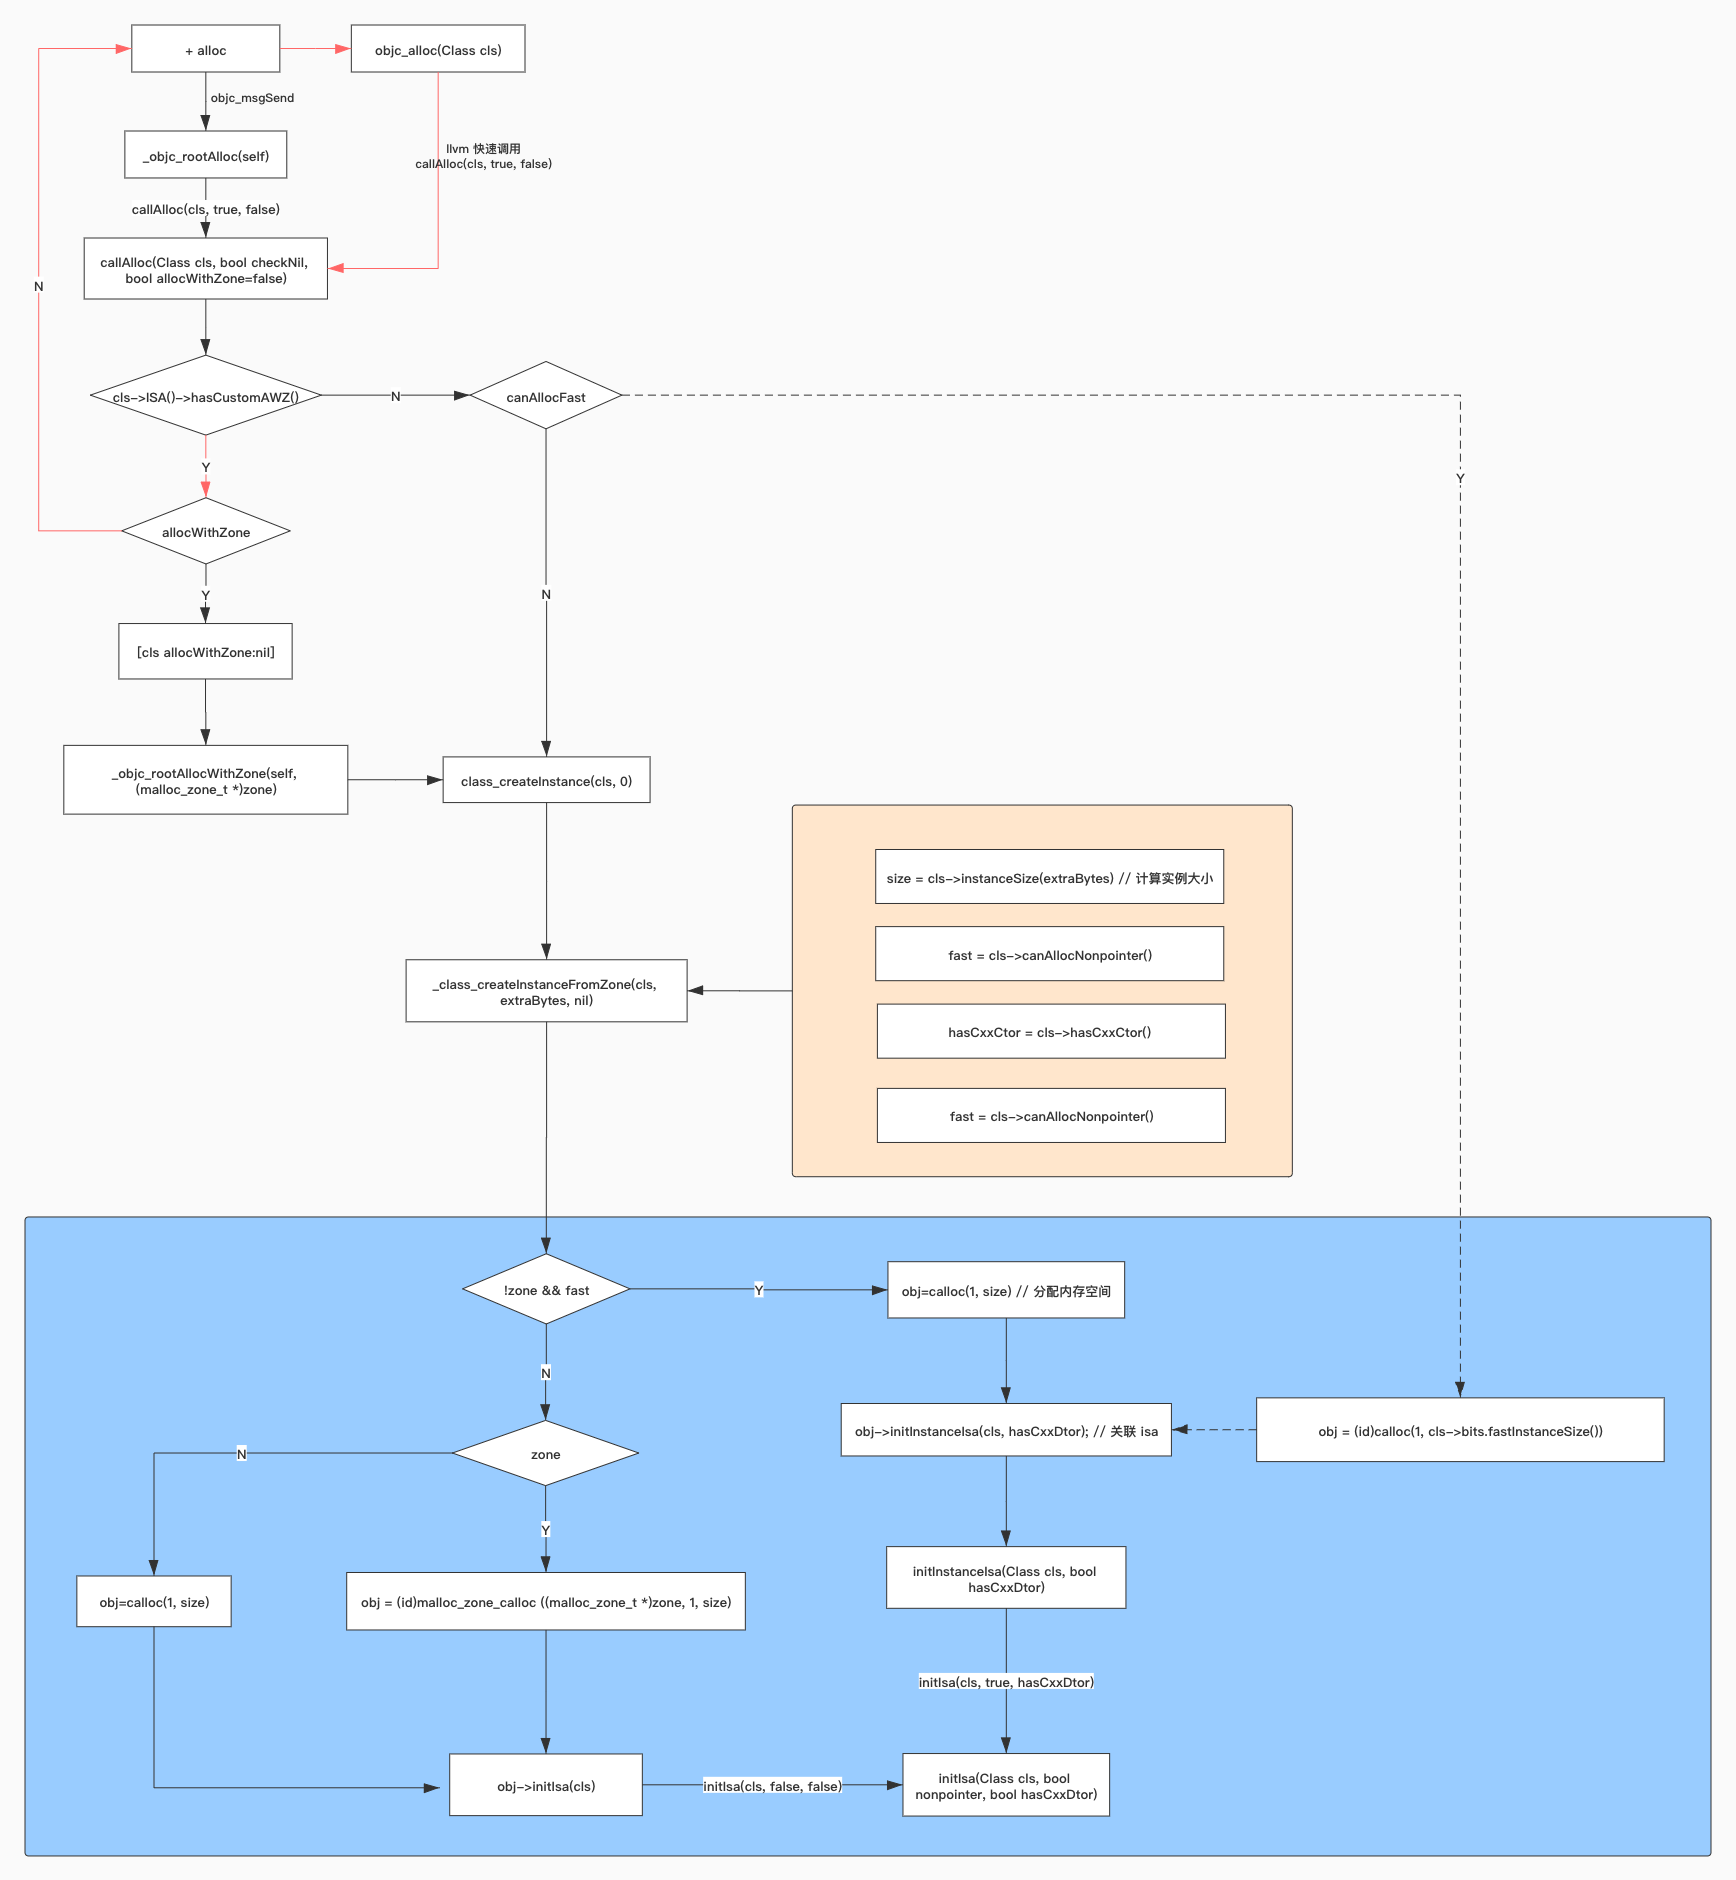
从流程图结合代码调试,对象创建的实质其实就是:
调试技巧
补充一些调试的小技巧 😉
方法跳转到声明
当我们调试到某个方法,cmd + space 即 jump to definition 时,只能看到方法声明而没有实现时:
通过
step into借助控制台输出真正的方法实现
当某个方法里代码很长时
我们可以将一些分支代码折叠:
Xcode->Perferences->Text Editing -> 勾选 Coding folding ribbon
然后在需要地方:
- 折叠
option + cmd + ◀︎ - 展开
option + cmd + ▶︎
常用数据类型占用内存
| data type | ILP32 size | ILP32 alignment | ILP64 size | ILP64 alignment |
|---|---|---|---|---|
| char | 1 byte | 1 byte | 1 byte | 1 byte |
| bool | 1 byte | 1 byte | 1 byte | 1 byte |
| short | 2 byte | 2 byte | 2 byte | 2 byte |
| int | 4 byte | 4 byte | 4 byte | 4 byte |
| long | 4 byte | 4 byte | 8 byte | 8 byte |
| long long | 8 byte | 4 byte | 8 byte | 8 byte |
| NSInteger | 4 byte | 4 byte | 8 byte | 8 byte |
| CF_index | 8 byte | 4 byte | 8 byte | 8 byte |
| pointer | 4 byte | 4 byte | 8 byte | 8 byte |
OS X以及iOS中与硬件环境相关的预定义宏
| 宏定义 | bits | 架构 |
|---|---|---|
| __i386__ | 32 | x86 |
| __x86_64__ | 64 | x86 |
| __arm__ | 32 | ARM |
| __arm64__ | 64 | ARM |
__LP64__: 表示指针长度为64位,即地址长度以64位长度来表示。
lldb 命令
| 命令 | 描述 | 例子 |
|---|---|---|
| po | 输出对应值 | po obj |
| p | 输出值+值类型+引用名+内存地址 | p obj |
| p/x | 常量的进制转换:十六进制 | p/x 100 |
| p/d | 常量的进制转换:十进制 | p/d obj |
| p/t | 常量的进制转换:二进制 | p/t obj |
| x | 十六进制打印内存对象地址 | x obj |
| x/nxg | 16 字节打印对象内存地址,打印 n 段 |
x/4xg obj |
| bt [n] | 打印调用栈,可以指定帧数 | bt 10 |